A weak or failed FICM on a 6.0L Power Stroke can cause a number of conditions, including no start, rough/hard start, misfire, engine stalling, and/or related intermittent problems. Replacing the FICM is not an extensive undertaking and requires only moderate mechanical aptitude. It is highly recommended that the FICM relay be replaced anytime the FICM itself is replaced. In certain contexts, the FICM may be referred to by Ford as the IDM, or injector driver module.
Fuel Injection Control Module (FICM) Overview
With regard to the 6.0L Power Stroke diesel, FICM refers to the Fuel Injection Control Module. The FICM's role is to actuate each individual injector solenoid at the right moment (injector timing) and for the correct duration (injector pulse width) as commanded by the PCM. Actuating an injector solenoid requires that the FICM supplies 48 volts of electricity to that solenoid. A dead FICM will therefore leave the system with no way to actuate an injector and the engine will not start. A weak or failing FICM will contribute to hard start, rough idle, and/or intermittent rough running conditions.
6.0 Power Stroke FICM Diagnostics & Troubleshooting
While engine heat and vibration contributes to FICM failures, the number one cause (arguably) is a low battery voltage condition. As the FICM supply voltage drops the electrical current increases, damaging the FICM's fragile circuitry. Low battery voltage is the result of poor battery condition, a weak/failed alternator, or a combination of both. As such, healthy batteries and a fully functioning alternator are imperative to avoiding a FICM failure. Jump starting a 6.0L Power Stroke or attempting the crank the engine with weak batteries places severe strain on the FICM and both should be avoided - this engine is very sensitive to battery condition.
A fully charged 12 volt automotive battery should read in the 12.6 to 12.7 volt range. Anything lower than 12.6 indicates a battery is not fully charged. If a battery is not holding a full charge, it needs to be replaced. An alternator should maintain 13.5 (+ or -) volts while running lights and accessories. If you batteries and/or alternator do not fall within spec, they should be replaced before replacing the FICM.
A faulty or otherwise malfunctioning FICM may be related to a number of conditions including, but not limited to:
• No start condition, including no start only when engine is hot
• Rough start, especially when an engine is cold (problem often amplified in extremely cold weather)
• Engine stalling
• Injector misfires
• Engine runs rough or erratically, including intermittent events
FICM Test Procedures
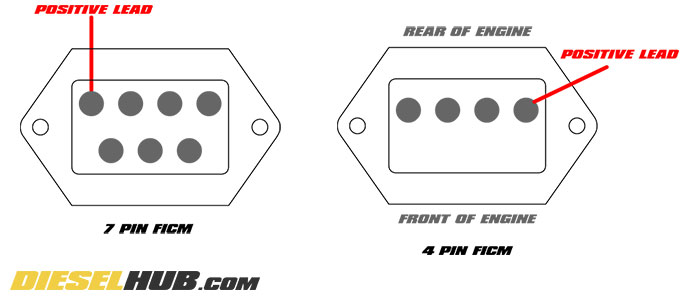
The simplest way to test FICM output voltage is with an appropriate scan tool or diagnostic system. If you do not have access to such equipment, the FICM possesses a small access port held down by (2) T-20 Torx bolts. Upon removing the access cover, you will see either 4 or 7 metal pins. 2003 and early 2004 model year engines (build date prior to 9/23/2003) will feature a 7 pin FICM, while later engines will utilize a 4 pin FICM. Using the figure below, you can probe the proper pin to measure the output voltage with a digital multimeter. Place the positive probe on the correct pin and the negative probe directly to the negative battery terminal. Do NOT allow your multimeter probe to touch the FICM housing during this procedure.
To fall within factory spec there should be a minimum of 45 volts with the key in the "RUN" position, while cranking the engine, and while the engine is running. Ideally, you want to read 48 volts during these procedures and do not want the voltage dropping at all while the engine is cranking. However, as low as 45 volts is still within spec. Anything less than 45 volts, even momentarily, indicates that the FICM should be replaced or repaired. A 0 volt reading while cranking may be the result of the FICM fuse and relay as this indicates that there is no logic power to the module.
Testing FICM voltage on a 6.0L Power Stroke Diesel
FICM Part Numbers
When selecting a FICM, whether it be new or remanufactured, always order a unit that is compatible with the model year of your vehicle. Several versions were produced, and while they are all cross compatible, a FICM from a different model year may throw a "soft" DTC.
Application |
Part Number |
2003 F-Series/Excursion |
|
Early 2004 F-Series/Excursion |
|
Late 2004 F-Series/Excursion |
|
2005 F-Series |
|
Early 2005 Excursion |
|
Late 2005 Excursion |
|
2006 - 2007 F-Series |
|
2004 - 2007 E-Series Van |
|
FICM Relay, All Applications |
How to Remove & Replace the FICM on a 6.0 Power Stroke Diesel
Click any thumbnail to view high resolution fullsize image w/ addition details (where applicable)
• Disconnect both negative battery cables.
• Remove the intake tubing between the turbocharger compressor inlet and the air filter assembly.
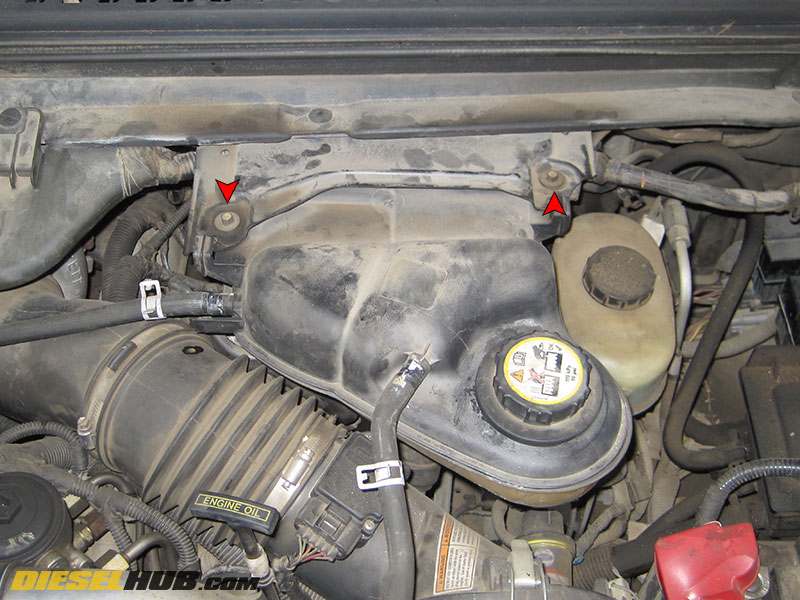
• Unfasten the degas bottle (two bolts with 8mm socket) then carefully push it aside and out of the way.

• Alternatively, you can remove the degas bottle altogether. This allows you to work in a much less cluttered space and protects the degas bottle fittings from cracking while it is pushed aside. To do so, you will need to remove 1.5 to 2 gallons of coolant via the radiator petcock (valve is located on driver side, bottom of radiator). Once you have partially drained the radiator, remove and plug the three hoses connected to the degas bottle followed by the degas bottle itself.

• Remove the intake tubing bracket, which shares mounting studs with the FICM.
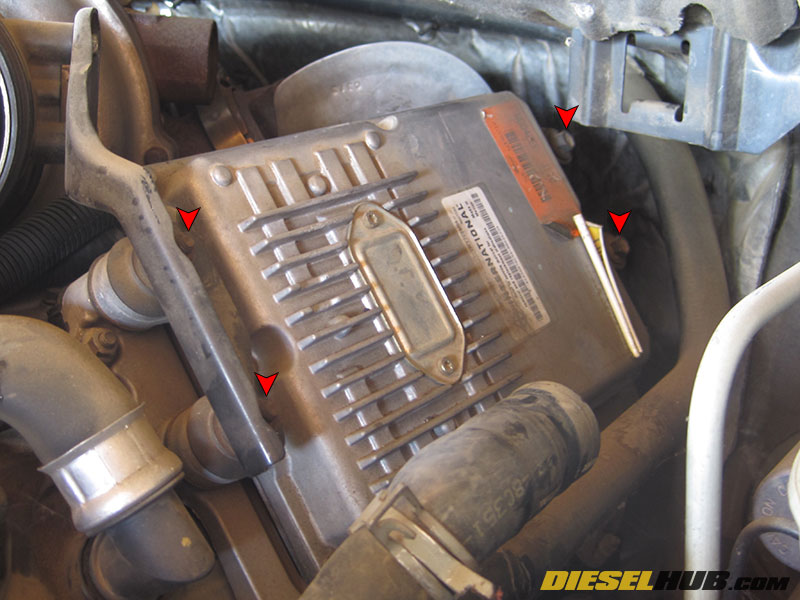
• Unbolt the FICM using a 10 mm socket for the (2) bolts located towards the front of the engine and a 13 mm socket for the (2) bolts located towards the firewall.
Note - FICM bracket will vary by model year.
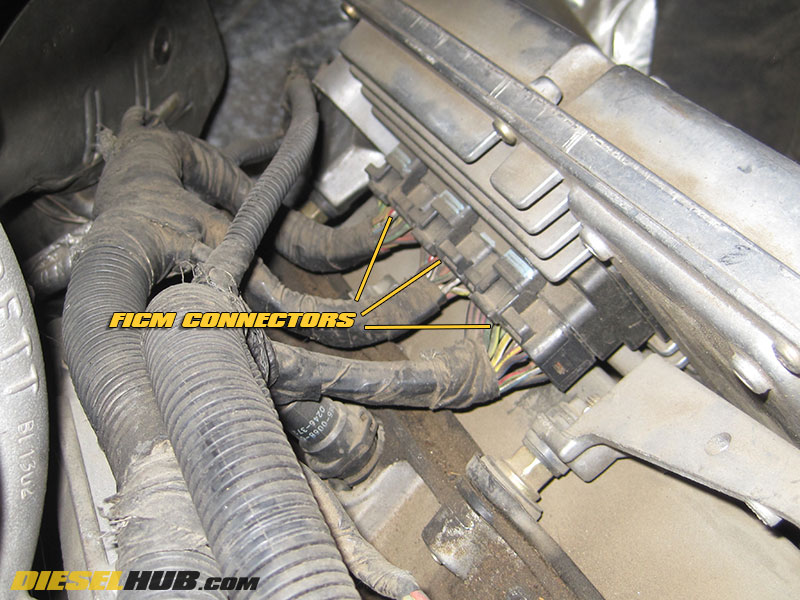
• With the FICM unbolted, tilt it slightly to access the connectors on the back. Remove all (3) connectors delicately - each is held in place by a locking tab on top and bottom of the connector (2 tabs) that must be depressed before pulling.
• Install your new FICM and replace all removed components in reverse order. Make sure the FICM connectors are fully seated - erratic behavior that is difficult to diagnose has been linked to FICM connectors that are not fully seated.
• Replace engine coolant if it was removed.
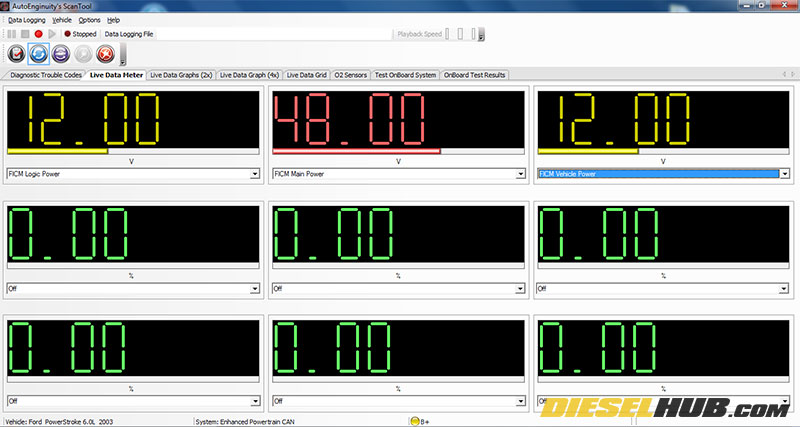
With AutoEnginuity, a PC based diagnostic tool, you check both FICM voltage (delivery voltage to injector solenoids), FICM logic power, and FICM vehicle power (12 volt supply to FICM). You'll want to check these parameters KOEO (key on, engine off), while cranking the engine, and KOER (key on, engine running). This can be used to diagnose a faulty FICM as well as confirm that a replaced FICM is operating properly.
Note - there are additional scan tools available that will allow you to read FICM parameters.