Pulling the turbocharger on a 1994 - 1997 "OBS" and early 1999 Super Duty is quite a headache the first time around - don't be discouraged, you'll be an expert by the time you're done. And if you happen to forget the tricks and tips you taught yourself the first time, the procedures below will walk you through it. The problem with removing the turbo on these model year pickups is not only that access is relatively difficult, but we're talking about trucks that are 20+ years old and thus many of the bolts/nuts are likely frozen. Exhaust hardware is stubborn in general, and it doesn't help that the up-pipe to turbine flange is difficult to reach with normal hand tools.
Removing and installing a turbocharger on a late 1999 - 2003 Super Duty equipped with a 7.3L Power Stroke is relatively straight forward. In fact, it's easy in comparison to removing the turbo from an earlier 7.3L Power Stroke or the later 6.0L Power Stroke. With the turbocharger removed, inspect the up-pipe collector gaskets; they should be replaced if the collector moves excessively or there are signs that the collector donut gaskets are leaking.
Parts List for Turbocharger Installation
Part Description |
Part Number |
Remarks |
Turbocharger reinstall kit |
Garrett 468481-0001 |
--- |
Turbocharger pedestal to block o-rings |
Ford F4TZ-6N653-A |
[1],[3] |
Intake Y pipe to compressor outlet o-ring |
[2] |
|
Turbine inlet gasket |
Ford F4TZ-6N640-B |
[1] |
Downpipe Marman clamp |
[4] |
|
Intake Y Marman clamp |
[4] |
|
Ford high temp anti-seize |
[5] |
[1] - Included in turbo reinstall kit 468481-0001
[2] - Not included in turbo reinstall kit, must be purchased separately
[3] - Additional o-rings required if pedestal is separated from turbocharger
[4] - Can be reused if condition is acceptable; replacement is highly recommended
[5] - Can substitute with any high temperature anti-seize; product must meet or exceed 2,000 °F rating
1994 to Early 1999 Turbo Removal Procedures
Click any thumbnail to view high resolution fullsize image w/ addition details (where applicable)
• Remove the intake tubing from the turbocharger inlet to the air filter assembly.
• Remove the intake Y pipe and intake boots. Cover the intake manifold openings with clean rags to protect from debris.
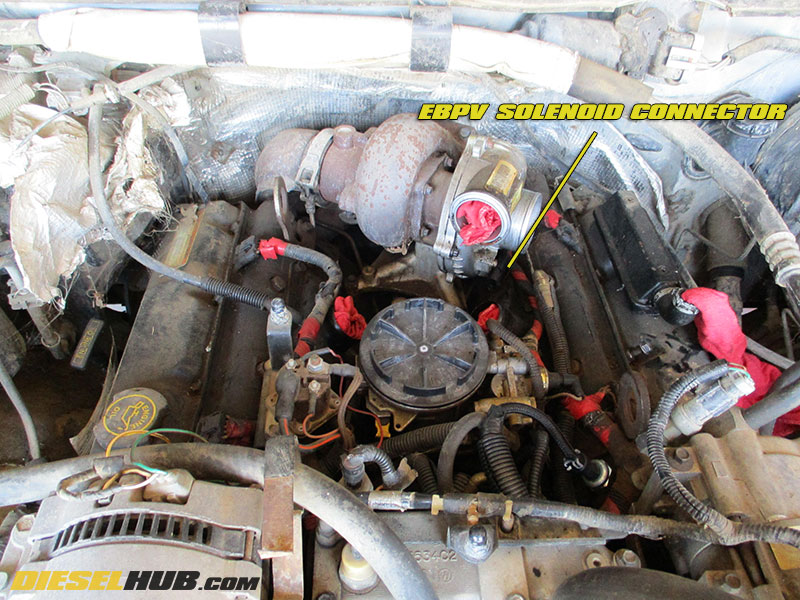
• Disconnect the EBPV solenoid electrical connector located at the face of the compressor housing.
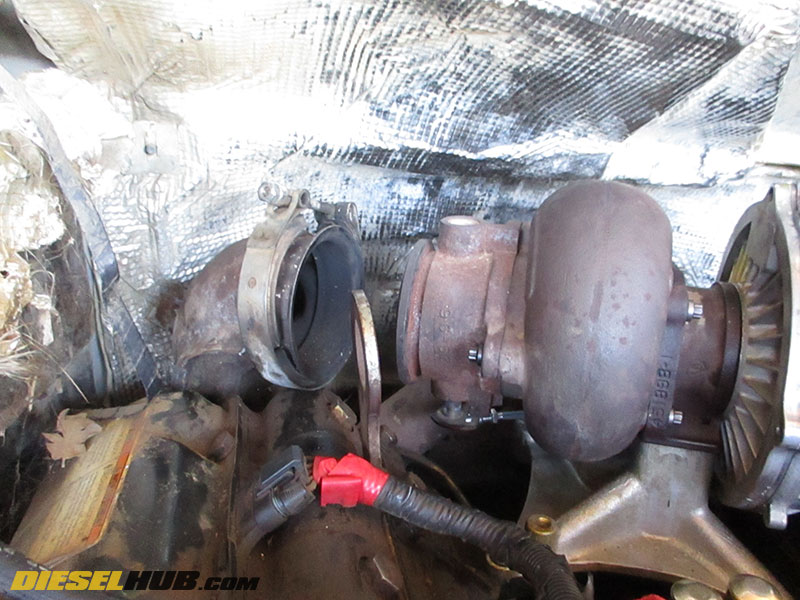
• Loosen the downpipe Marman clamp with an 11 mm deep socket and separate the downpipe from the turbocharger turbine outlet. Push the downpipe downwards and away from the turbo.

• Disconnect the exhaust backpressure valve actuator latch from the EBPV linkage by sliding the latch down the rod towards the driver side of the vehicle. Once the latch has been released, pull the rod end downwards to disconnect.
• Remove the EBPV. It is held in place by (3) bolts that require an 8 mm, 12 point socket; a six point socket will not fit.
• The first bolt is located in plain view at the front of the turbine housing.
• The second bolt is towards the rear of the turbine housing (towards the firewall) near the top of the EBPV.
• The third bolt is located towards the rear of the turbine housing (towards the firewall) and towards the bottom of the EBPV. Feel for it - you won't be able to see it without an inspection mirror.
A 1/4 in drive socket and deep 8 mm, 12 pt socket are able to reach all (3) bolts without an extension.
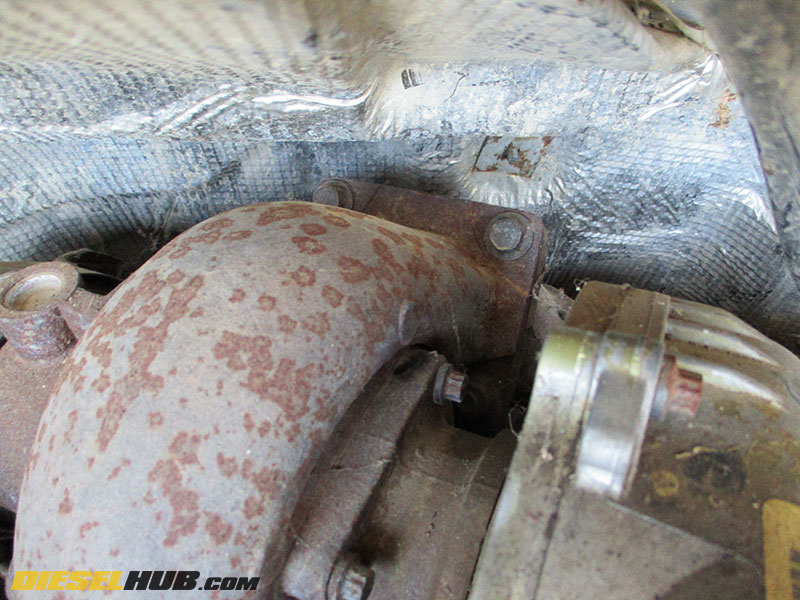
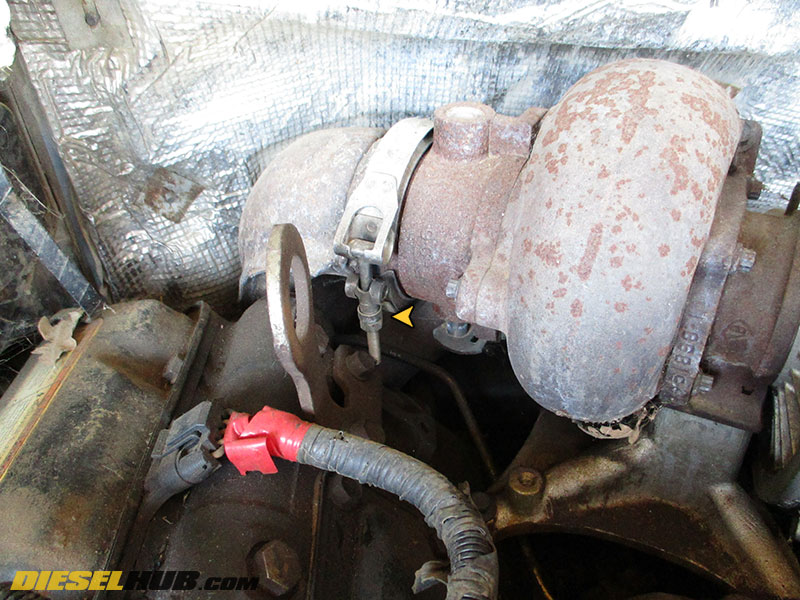
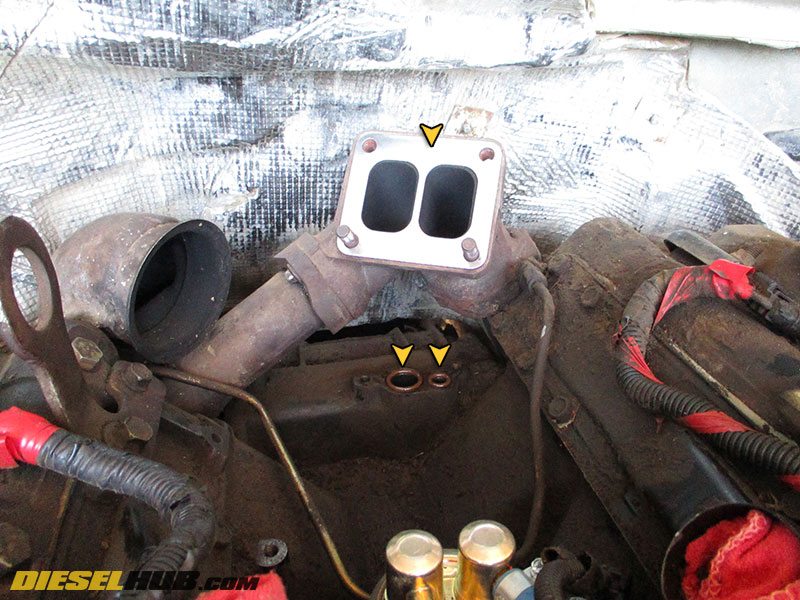
• Remove the (2) bolts and (2) nuts securing the turbine housing inlet to the up-pipe flange. The bolts have 13 mm heads, the nuts have 15 mm heads (if they have been changed previously, the head size may differ). You may find them easier to remove if you spray them with a penetrating fluid and let it soak first.
The two top bolts are straight forward and easy to access. The driver side nut can be removed with a box end wrench. You can also break the nut loose with a wrench and then remove it with a 15 mm swivel socket.
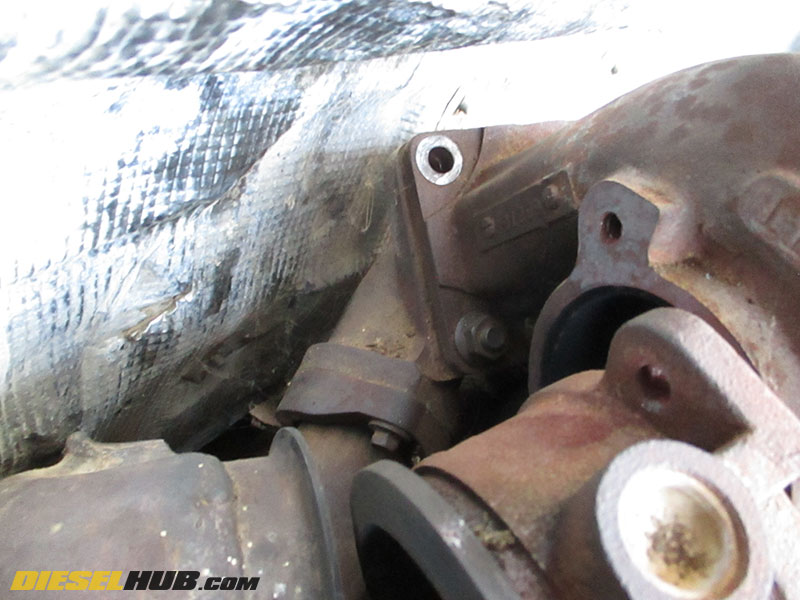
• The passenger side bottom nut is difficult to access. A standard wrench is too long and will hit the downpipe and firewall. A socket will not fit between the flange and turbine housing. A short wrench will fit but provides insufficient leverage to break the nut loose in most cases.
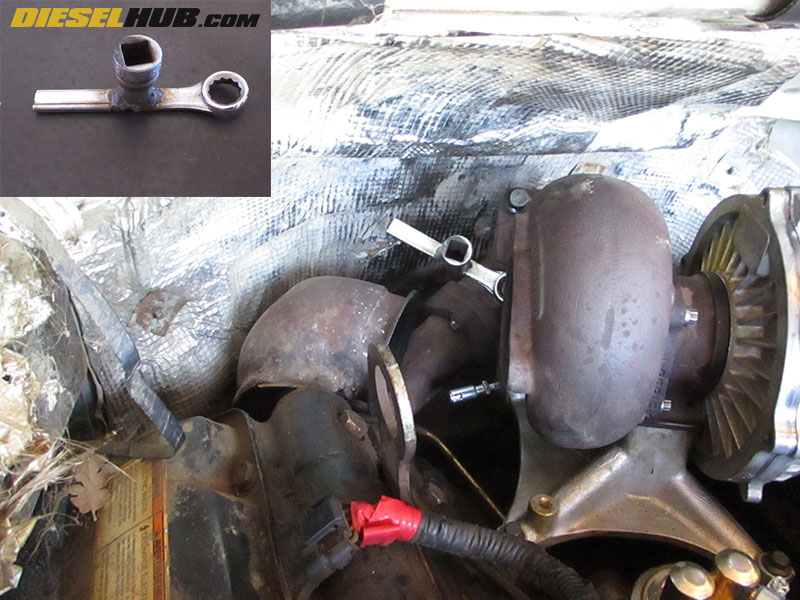
• One solution is to fabricate a short wrench with a 1/2 in drive socket welded to it. Therefore, the nut can be broken loose with a breaker bar or 1/2 in drive ratchet and then removed with the shortened wrench. See image at left for details. The overall length of the wrench once cut is 4.5 inches. The 1/2" drive socket is welded 2 inches from the center of the socket to the center of the box end; worked perfectly.
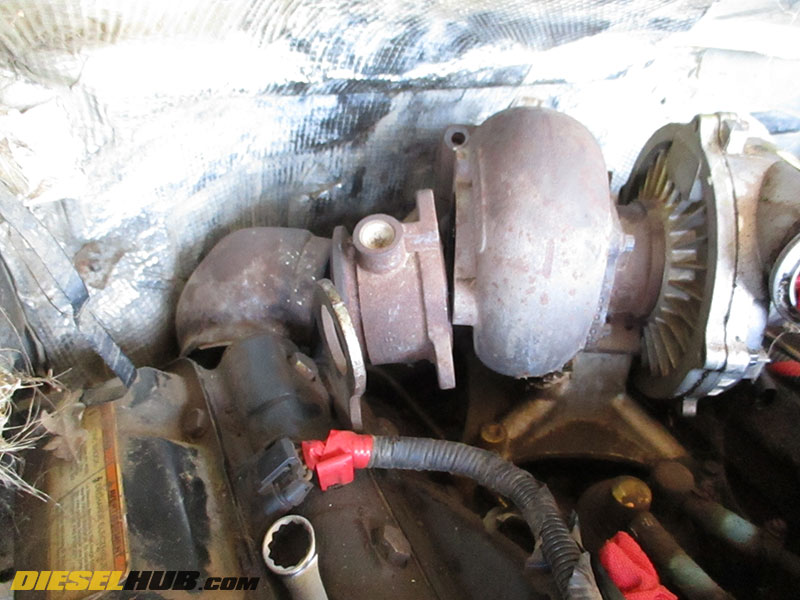
• Remove the front (2) turbocharger pedestal bolts with a 10 mm socket.

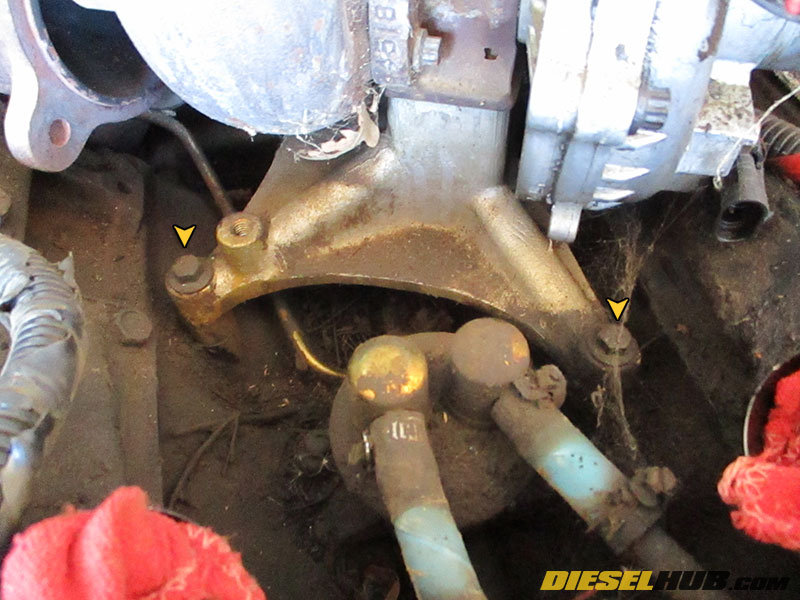
• Remove the rear turbocharger pedestal bolts. With the turbocharger installed, it is impossible to capture images of the bolts, therefore we've provided a photo of the pedestal removed from the engine. The passenger side bolt can be removed with a 10 mm wrench. The driver side bolt is hidden behind the EBPV actuator and can only be accessed with a 10 mm swivel socket. You will not be able to see the head of the bolt - feel for it. It may take several tries to get the socket on the bolt. Refer to the image for bolt locations.
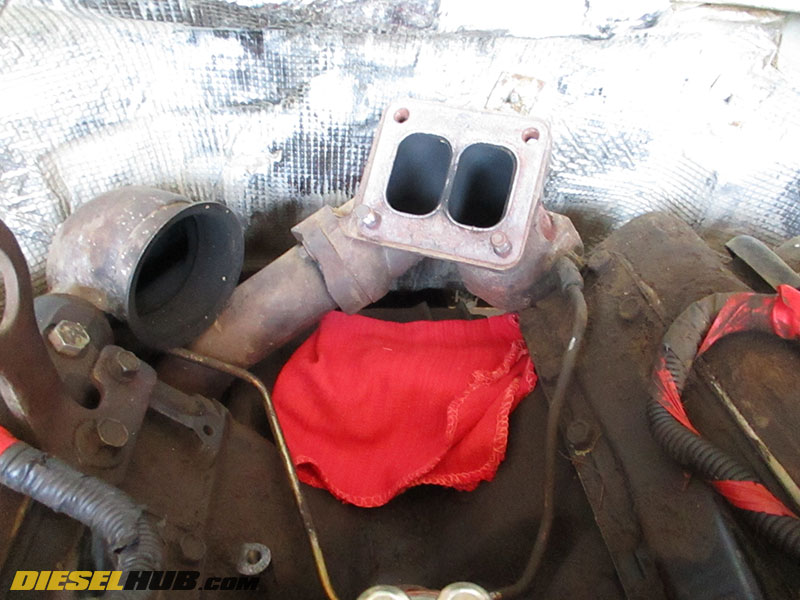
• Lift the turbocharger/pedestal assembly upwards and towards the front of the vehicle to remove from the engine. Discard the the oil supply and return port o-rings, then cover with a clean rag to keep debris out. Remove and discard the up-pipe collector gasket.
Turbocharger Installation
• If the EBPV is not removed from the turbine housing we recommend removing it and installing it once the turbocharger is mounted to the engine - it makes installation much simpler by increasing access to the pedestal and up-pipe flange bolts.
• Liberally coat the new oil supply and return o-rings (pedestal to engine block) in clean motor oil and install them on the engine flange.
• Install the new gasket on the up-pipe collector flange.

• Install the rear pedestal bolts onto the turbocharger pedestal. Use electrical tape to hold them in place and keep them from falling. The threaded tip of the bolt must be above the bottom of the pedestal or they will catch during installation. Leave the tape long so that it can be removed once the turbocharger is in place.
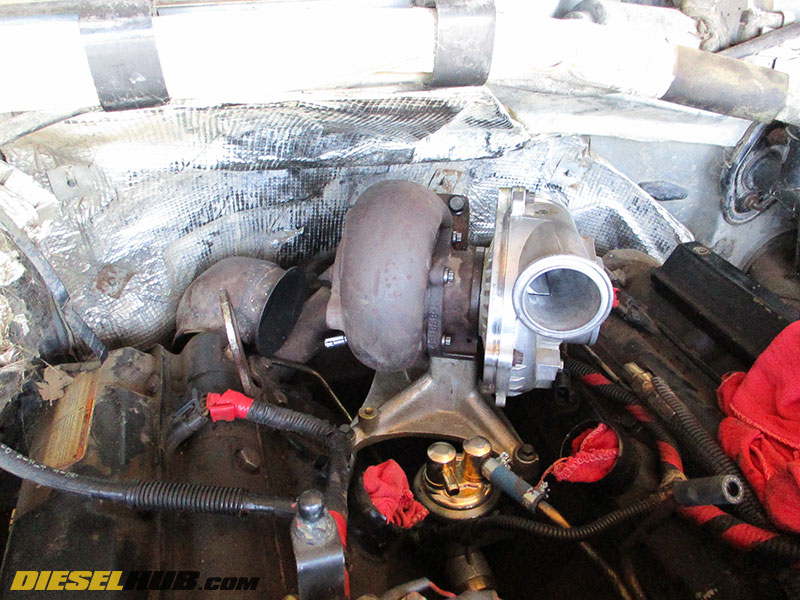
• Slide the turbocharger onto the up-pipe collector flange and downwards onto the engine block. Be extremely careful not to loose the o-rings as you slide the turbocharger into place.
• Remove the tape being used to hold the rear pedestal bolts in place.

• Start all (4) turbocharger pedestal bolts loosely, then torque down in a criss cross fashion. Tighten snug to ensure the oil supply/return o-rings seat properly.
The driver side rear bolt may take some patience in order to get it started. Do not use a ratchet - turn you're extension/swivel socket by hand to get it started.
• Install the up-pipe collector flange nuts and bolts. If desired, lightly coat them with high temperature anti-seize so that they will be less difficult remove in the future.
• Once all (4) nuts/bolts are installed hand tight, torque them down. You may need to re-tighten these after the engine has run a few times.
• Reconnect the EBPV solenoid to the engine harness (connector at face of turbocharger).
• Reinstall the EBPV and reconnect the EBPV actuator rod latch to the EBPV linkage. You may wish to use high temp anti-seize on the EBPV bolts.
• Reinstall the downpipe. Ensure that the Marman clamp completely seats around both the downpipe and EBPV flanges. You may need to completely remove the Marman clamp nut to get a positive seal. If the Marman clamp is disfigured, consider replacing it (see part number list above).

• Reinstall the intake Y pipe and all intake tubing.
• Start the engine and check for air/oil leaks.