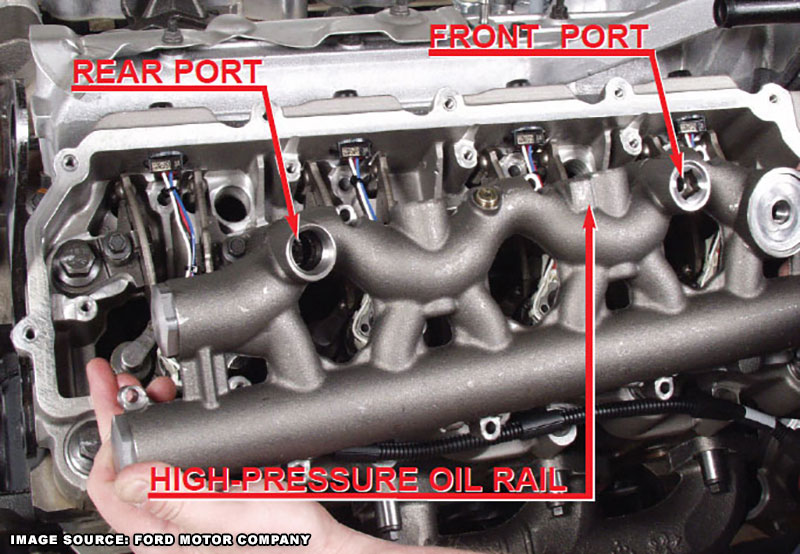
The ball tubes, sometimes also referred to as nipple cups due to their shape, are an integral component in the high pressure oil system on the 6.0L Power Stroke diesel that supply highly pressurized engine oil through the top of each injector. A basic o-ring seal seals the ball tube to the high pressure oil rail and in the event of a leak crucial oil pressure can be bled off beneath the valve cover, reducing the overall performance of the system.
Like all o-rings, gaskets, and seals, these have a finite life and will require replacement some time, if not multiple times throughout the service life of the engine. High pressure oil system leaks can be difficult and costly to track down, thus we highly recommend these are serviced anytime the high pressure system is disassembled (i.e. during a fuel injector replacement).
Replacing the o-rings themselves is a straight forward procedure, although a moderate degree of mechanical aptitude is required to remove, reinstall, and reassemble properly. A special socket is required to remove the cup from the oil rail and access the seal; there is no work around or cheap trick, you'll need to break down and purchase the proper socket (refer to parts list below for options).
If you are replacing the ball tubes/nipple cups because a leak in the high pressure oil system is suspected or has been identified, we highly replacing the standpipes at the same time as the seals are subjected to similar conditions and can be assumed to have similar life cycles. After this procedure is completed, we highly recommend replacing the fuel filters, engine oil, and lube oil filter since the oil and fuel systems are vulnerable to contamination during this repair process.
Ball Tube Parts List
Note that this page is not endorsed or sponsored by any particular manufacturer or parts supplier; all parts featured herein were acquired at retail cost through common retail channels. We have chosen to upgrade to CNC machined tool steel ball tubes from HHC diesel, which are included in the parts list below. We've had great success with these products and highly recommend them as an upgrade to the OEM alternatives.
Description |
Part Number(s) |
Remarks |
Ball tube set |
[1] |
|
Ball tube o-ring/seal |
[2] |
|
Ball tube removal socket |
[3] |
|
Fuel injector o-ring/seal kit |
[4] |
|
Engine oil filter |
[5] |
|
Fuel filter kit |
[6] |
|
Valve cover gasket |
[7] |
[1] - Tool steel "leak-proof" nipple cup/ball tube upgrade; patent pending design with a lifetime warranty.
[2] - Viton fluoroelastomer nipple cup/ball tube seal kit. Quantity (1) includes (8) individual o-rings and services both cylinder heads (4 o-rings required per cylinder head).
[3] - External hex socket, impact rated; required to remove the nipple cups/ball tubes from the high pressure oil rail.
[4] - Recommend replacing injector o-rings while the oil rail is removed from the cylinder head. Quantity (1) services a single fuel injector, thus (8) seal sets are required to service all fuel injectors.
[5] - Highly recommend replacing the engine oil and lube oil filter after engine is reassembled due to likelihood of contamination.
[6] - Highly recommend replacing the engine and chassis mounted fuel filters after engine is reassembled due to likelihood of contamination if fuel injector o-rings are replaced at this time; Motorcraft FD-4616 includes both fuel filters.
[7] - Inspect while removed and replaced as necessary; gasket is reusable it not cracked, damaged, etc.
How to Remove the High Pressure Oil Rails on a 6.0 Power Stroke
The following procedures are based on the 2003 to early 2004 model year engine design featuring the "log" style high pressure oil rail. Nipple cup/ball tube o-ring replacement procedures are identical for 2004.5 to 2007 model years with the "wavy" style high pressure oil rail. These procedures address the slight changes in oil rail removal and are applicable to ALL model year engines.
Click any thumbnail to view high resolution fullsize image w/ addition details (where applicable)

• Disconnect both negative battery cables and carefully position out of the way so that they may not accidentally come in contact with the terminals.
• Drain 2 to 3 gallons of engine coolant from the radiator (drain valve on driver side bottom of radiator) into clean plastic containers so that it may be reused.
• Remove the degas tank, hot and cold side intercooler tubes, air filter assembly, and all intake tubing to the turbocharger.
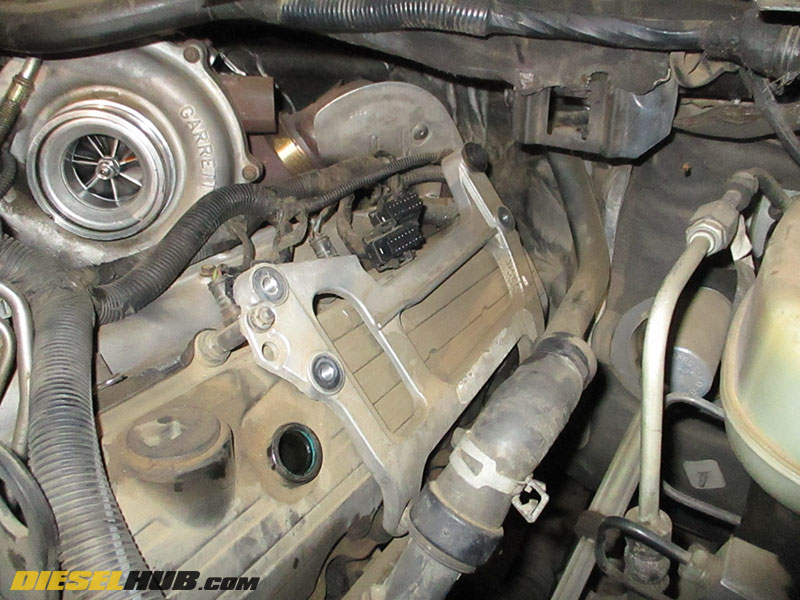
• On the driver side, remove the fuel injector control module (FICM). It is secured to the FICM bracket on the valve cover using two bolts and two studs (10 mm socket for rear bolts, 13 mm socket for front studs). Before removing, carefully disconnect the three electrical connectors from the backside of the FICM.
• Remove the FICM bracket using a 10 mm socket (5 studs). The stud also secures the valve cover to the cylinder head and it is common for the entire stud, not just the 10 mm nut, to be removed.
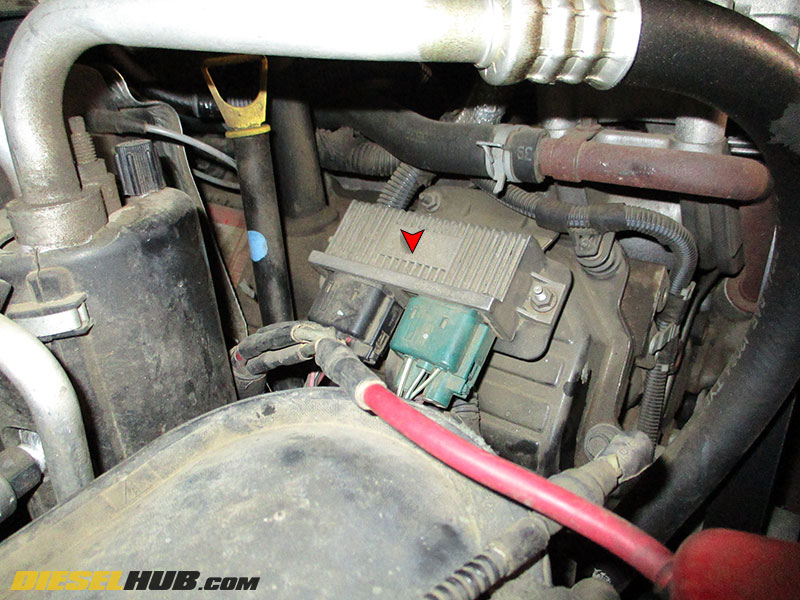
• Unplug both connectors from the glow plug control module, then remove the controller and bracket from the passenger side valve cover (3 x 10 mm socket). For 2004.5 to 2007 model engines, unplug and remove the ICP sensor.
• Remove the oil fill tube (unscrew) and screw in the oil fill cap in its place (they are the same thread, this will protect debris from falling into the head while removing the valve cover).
• Optional - remove the alternator for even more clearance on the passenger side. It is secured with 3 bolts (15 mm socket) and the added workspace is well worth the 5 minutes required to remove it.

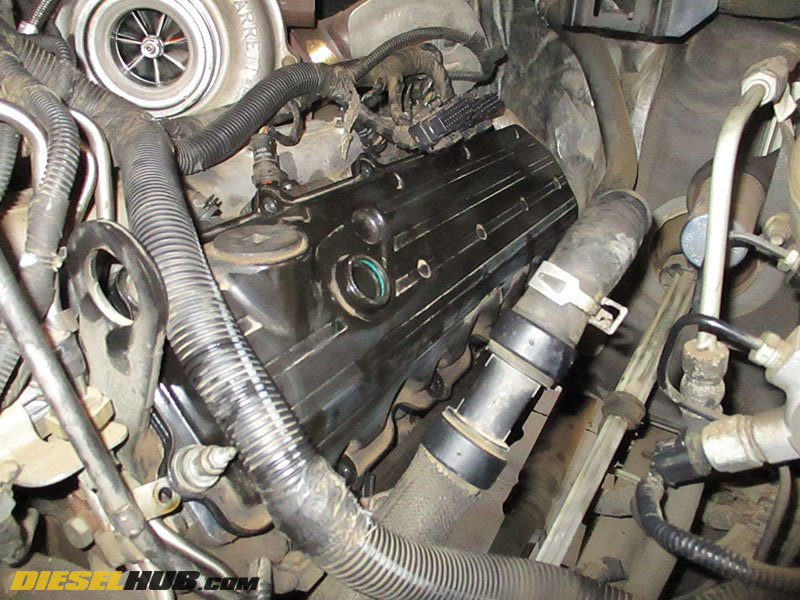
• The valve cover is held to the cylinder head using 11 bolts/studs. Remove all the valve cover hardware using a 12mm socket/wrench. Once the bolts/studs are removed, carefully remove the valve cover and valve cover gasket from the cylinder head and set aside.
• The passenger side valve cover is more time consuming because of the limited access. A 12 mm socket, 12 mm box end wrench, and 12 mm ratcheting wrench work well in reaching all the bolts with relative ease. The bolts closest to the heater core are the most time consuming/biggest pain to remove.
From this point forward, be extremely careful not to drop tools or debris into the exposed valvetrain.
2003 and Early 2004 Model Year Oil Rail Removal
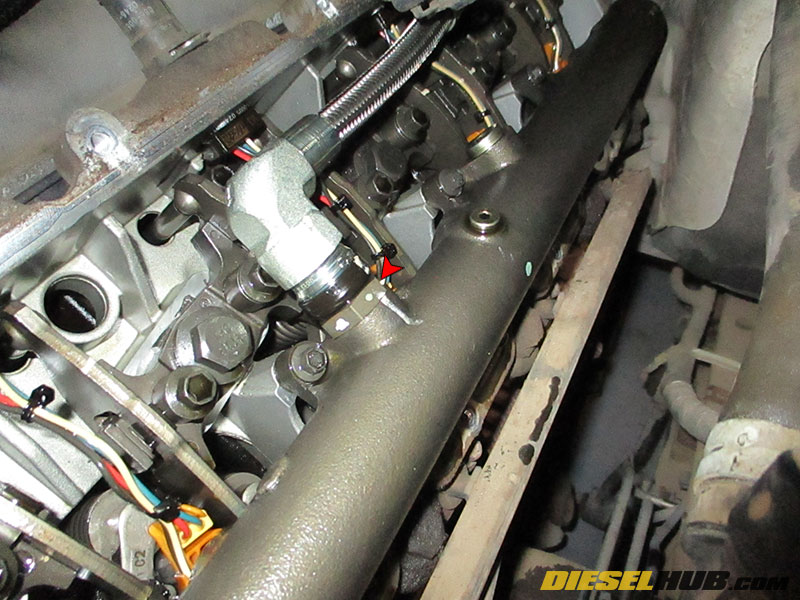
• Loosen then remove the nut connecting the stainless steel oil line to the high pressure oil rail using a 24 mm open end wrench. Ensure the mouth of the wrench is fully seated on the nut as it is covered in oil and can slip easily.
• With the nut removed from the oil rail, push the braided stainless steel line out of the way. It may leak oil so keep it above the cylinder head.
• The oil rail is secured to the cylinder head using (8) bolts. Remove all (8) bolts using an 8 mm socket. Take your time and do not drop any hardware in the cylinder head!
• With the bolts removed the high pressure oil rail can be lifted off of the cylinder head and injectors. Once the nipple cups are removed from the injectors, it will begin to leak oil. Keep the oil rail positioned over the cylinder head until the oil drains, then set it on a clean workbench.
Late 2004 to 2007 Model Year Oil Rail Removal
• The later "wavy" style oil rail is secured to the cylinder head using (9) bolts with a T-30 Torx head.
• If working on the passenger side, remove the ICP sensor gasket sandwiched between the high pressure oil rail and valve cover if it did not already come off when the valve cover was removed.
• Loosen the standpipe completely with a 12 mm Allen socket, then remove all (9) high pressure oil rail bolts using a T-30 Torx driver/bit. It is recommended that you tape (duct or electrical tape) the bit to any extension that you may be using so that the bit does not fall off in the cylinder head.
• With the hardware removed, lift the high pressure oil rail off of the cylinder head while simultaneously manipulating the standpipe (it can be fished out once the oil rail is lifted up). Once the nipple cups are removed from the injectors, it will begin to leak oil. Keep the oil rail positioned over the cylinder head until the oil drains, then set it on a clean workbench.

• Regardless of model year, drain as much engine oil from the high pressure oil rail as possible to reduce spillage while replacing the nipple cups. Again, the following procedures are applicable to ALL model year engines despite the difference in oil rail design.
• You will want to perform the following procedures on a CLEAN workspace. A large piece of cardboard works perfect for separating the engine parts from a dirty workbench.
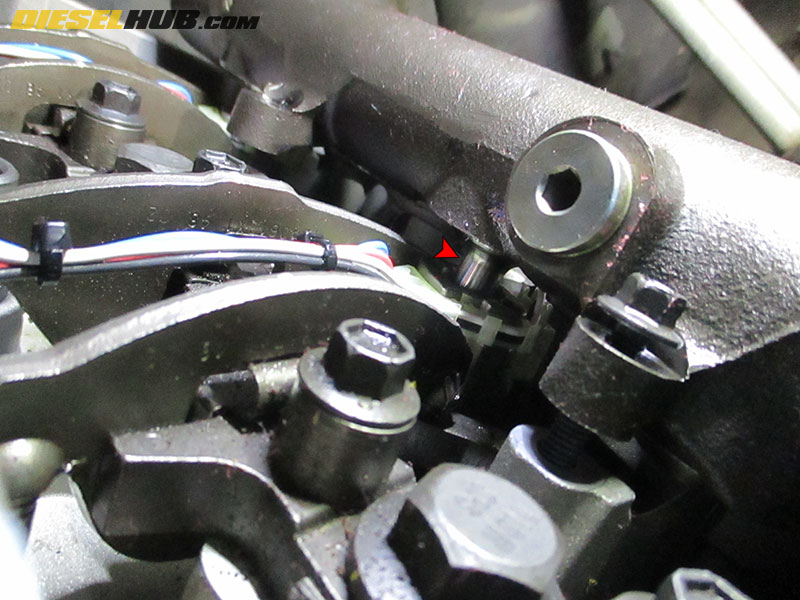
How to Remove the Ball Tubes (Nipple Cups) & Replace the O-ring Seals
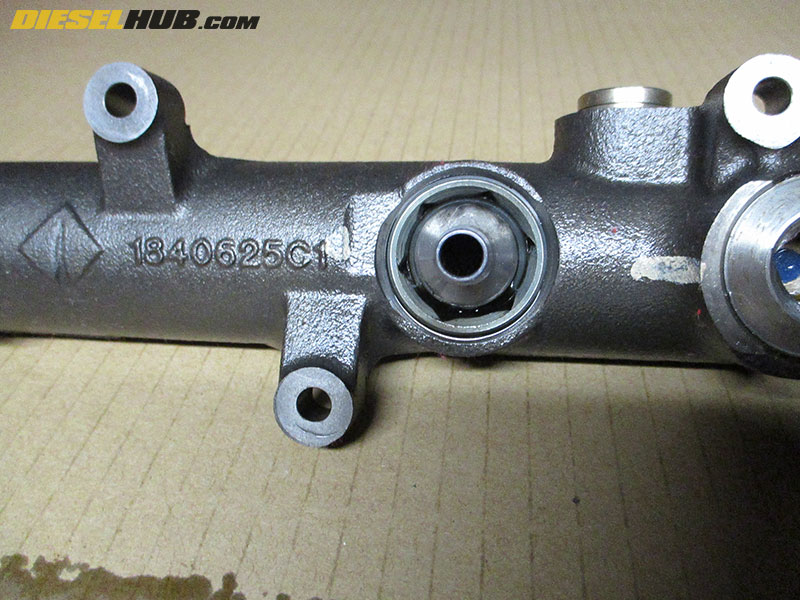
• The nipple cups/ball tubes require a special, low profile, hollow socket that is capable of sliding over the cup and inserting into the female hex ring (see parts list in table above). There is no workaround or shortcut; this tool is required. Do not attempt to break loose the hex rings without the proper tool. These are torqued to ~100 ft-lbs.
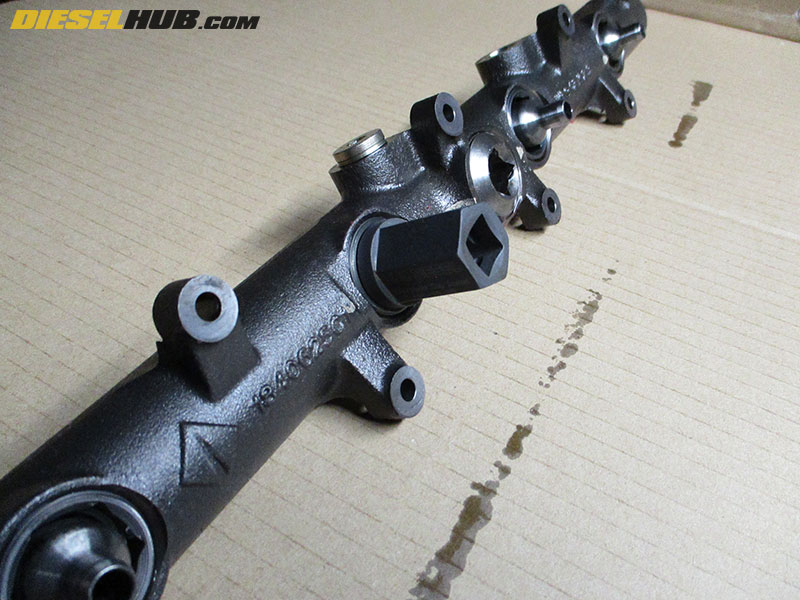
• Carefully secure the high pressure oil rail in a vice, making sure to clamp on a substantial part of the oil rail body (not a thin corner, bolt flange, etc).
• Insert the tool over nipple cup/ball tube and into the hex ring. Break the hex ring loose using a break bar or long ratchet (these are fairly tight).
• Once loosened, remove the oil rail from the vice and return it to a clean workspace.
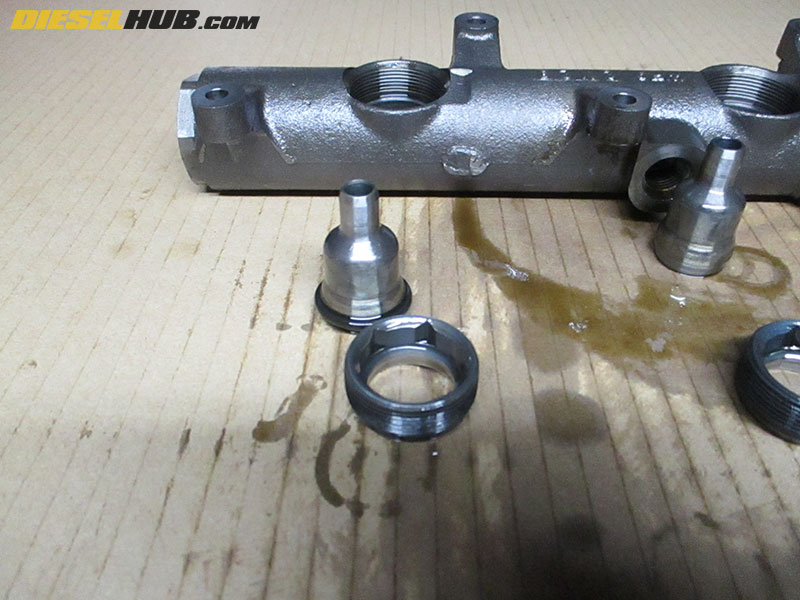
• Completely remove the hex ring, followed by the nipple cups/ball tubes and o-rings.
• Verify that all the o-rings have been removed from the high pressure oil rail. They often come out with the nipple cup/ball tube, but may also stay seated in the oil rail. Remove with a small pick if an o-ring did not come out with the nipple cup.
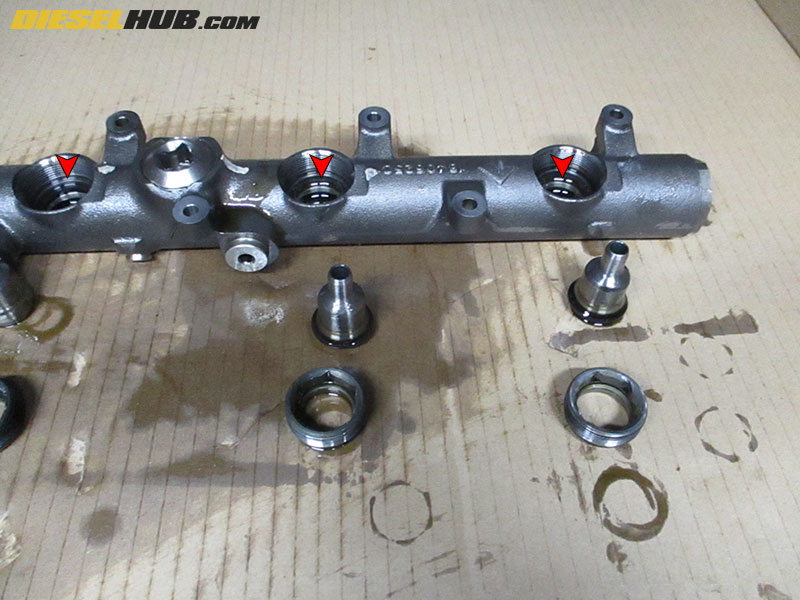
• Verify that the o-ring land inside the oil rail is clean of debris (pieces of o-ring, etc). Thoroughly coat the new nipple cup/ball tube o-rings in clean engine oil.
• Install each o-ring into the high pressure oil rail. Ensure that the o-ring seats flush in the land before installing the corresponding nipple cup.
• Install the nipple cups/ball tubes and hex ring. When installing the nipple cups, press into the high pressure oil rail and arrange it perpendicular before tightening down the hex ring. The cup is designed to rotate, but it's ideal that the cup be installed straight while seating the o-ring.
• Return high pressure oil rail to vice and torque nipple cup/ball tube hex rings to 100 ft-lbs.

• Locate and remove the o-ring at the top of each fuel injector that seals the ball tube to the injector solenoid. This o-ring is NOT to be reused as there is a high likelihood that it will leak.
• Install the new injector o-ring after coating it thoroughly in clean motor oil.
• Reinstall the high pressure oil rail, ensuring that it seats evenly in all 4 injectors before tightening down the hardware. Regardless of model year, torque all oil rail bolts to 96 in-lbs (INCH POUNDS).
• Tighten down the standpipe (2004.5+) or reinstall the fitting on the braided oil line (2003 - early 2004).
• Reinstall the valve covers, intercooler tubes, glow plug controller, air filter assembly, degas bottle, FICM, and all other items previously removed. Don't forget to refill the radiator with engine coolant through the degas tank. The valve cover gaskets are reusable so long as there are no cracks or damage. If in doubt, replace them - the gaskets are not particularly expensive.
• The engine will crank excessively until air is purged from the oil system. Additionally, it may run rough until ALL air is purged. Let the starter cool for 1 to 2 minutes between 10 to 15 second cranking intervals. Ensure batteries are fully charged before cranking.

• These HHC Diesel nipple cups are an upgrade over the OEM design. They're manufactured from tool steel and use a patented geometry to increase reliability over the factory design. The nipple cup set with seals is available here: HHC nipple cup/ball tube set