Dirty, contaminated, leaking, weak, failing, or failed fuel injectors on a 6.0L Power Stroke will exhibit symptoms characteristically similar to other engine management system problems; hard start, rough idle, excessive smoke, low fuel economy, stalling, and overall poor performance. Because parts for the 6.0L Power Stroke are not necessarily cheap, we highly advise you systematically diagnose such problems to properly identify the source; see 6.0L Power Stroke Diagnostics and Troubleshooting Procedures.
6.0 Power Stroke Fuel Injector Diagnostics & Troubleshooting
A failed fuel injector will be blatantly obvious and the ensuing misfire will be easily detectable. Additionally, a misfire DTC should be set (check engine light will illuminate), identifying the dead cylinder. On that note, injectors may be replaced individually as necessary; they do not need to be replaced in sets. However, 6.0L Power Stroke injector life is typically in the 150,000 to 200,000 mile range, with most owners beginning to experience symptoms of injector trouble at the early end of that spectrum. If the fuel injectors fit into this range we highly advise replacing all 8 injectors simultaneously to reduce labor cost and time. If a single high mileage injector fails, the remaining seven are likely close to a similar fate. Neglecting to replace worn injectors may result in excessive fuel dilution of the engine oil and therefore increased engine wear.
There are many components hidden under the valve covers that we highly recommend replacing if they have not recently been done so. At the very least, the high pressure oil rail nipple cups/ball tubes, nipple cup seals, and standpipes should be replaced on high mileage engines. 6.0L Power Stroke nipple cups and nipple cup seals are particularly important components that can cause a reduction of oil pressure to an injector. Recall that with both the 7.3L and 6.0L Power Stroke engines, oil pressure is everything when it comes to injection pressure.
Fuel Injector & Related Fuel System Parts List
Required Replacement Parts
The following parts are required to be replaced when removing and installation fuel injectors.
Description |
Part Number(s) |
Remarks |
Fuel injector, 2003- early 2004 |
[1],[2] |
|
Fuel injector, late 2004 - 2007 |
[1],[3] |
|
Fuel injector o-ring set |
[4] |
|
Fuel filter kit |
[5] |
|
Engine oil filter |
[6] |
|
Standpipe fitting tool |
[7] |
[1] - Sold individually
[2] - Trucks built 9/22/2003 and prior
[3] - Trucks built after 9/22/2003
[4] - May not be required if replacement injectors are sold with o-rings installed; fuel injectors from Ford come with new o-rings installed. Each o-ring set services (1) fuel injector.
[5] - Replace fuel filters after installing fuel injectors; kit includes both fuel filters, all required gaskets
[6] - Replace engine oil after installing fuel injectors
[7] - Required on 2003 and early 2004 engines only; removes braided standpipe to oil rail hose
Optional Replacement Parts & Upgrades
Replacement of the following parts is optional; listed parts can be reused unless they are found to be compromised.
Description |
Part Number(s) |
Remarks |
Oil rail ball tube seal |
[8] |
|
Ball tube removal tool |
[9] |
|
Standpipe, 2003 - early 2004 |
--- |
|
Right bank standpipe hose |
International 1837424-C1 |
--- |
Left bank standpipe hose |
International 1837425-C1 |
--- |
Standpipe kit, late 2004 - 2007 |
[10] |
|
Valve cover gasket |
--- |
|
ICP sensor valve cover gasket |
[11] |
[8] - Sold as a set of (8), servicing both oil rails
[9] - Special socket required to remove ball tubes
[10] - Kit includes standpipes and dummy plugs for both banks
[11] - Late 2004 to 2007 model year engines only; advise replacing before reinstalling passenger side valve cover to prevent leaks
How to Replace Fuel Injectors on a 6.0 Power Stroke
The following procedures are based on a 2003 model year engine. The primary difference between 2003 - early 2004 and 2004.5 - 2007 model engines is the high pressure oil rail design. Early engines use a "log" style high pressure oil rail, while later engines feature a "wavy" or "web" style oil rail. The function of the injection system and procedures outlined below are applicable to ALL model year 6.0L Power Stroke engines; differences are clearly noted.
Click any thumbnail to view high resolution fullsize image w/ addition details (where applicable)

• Disconnect the negative terminals from both batteries and secure aside.
• Drain 2 to 3 gallons of engine coolant from the radiator into clean containers (used 1 gallon water jugs, for example) so that it can be reused. The radiator drain petcock is located on the bottom of the radiator on the driver side.
• Remove the air filter, air inlet hose and bracket, passenger side intercooler tube (hot side), driver side intercooler tube (cold side), and degas bottle (remove degas bottle lines and position out of the way). Plug all air inlets (turbo compressor inlet/outlet, intercooler inlet/outlet, etc) with clean, lint free rags.
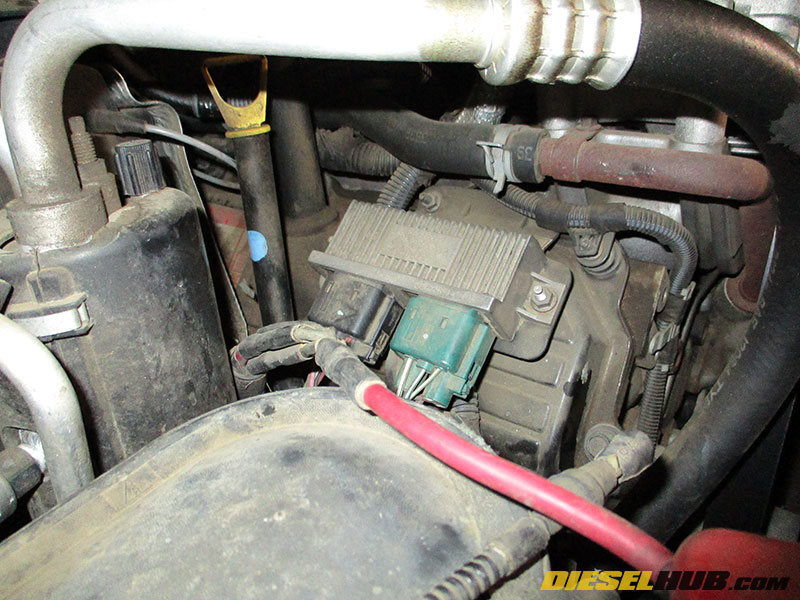
• Disconnect the two terminals from the glow plug controller on the passenger side valve cover, then remove the glow plug controller and bracket (10 mm socket).
• For 2004.5 and later model year engines, disconnect the ICP connector then remove the ICP sensor from the valve cover.
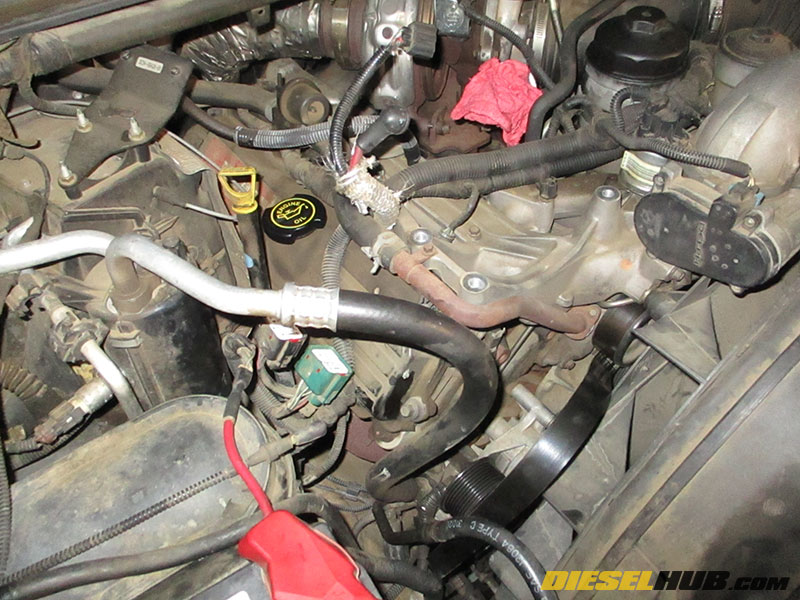
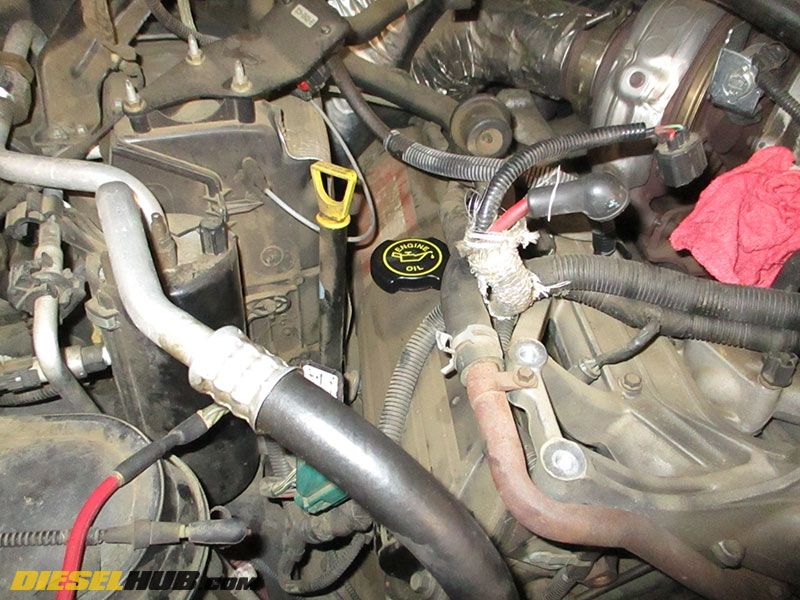
• Remove the oil fill tube from the passenger side valve cover, then screw the oil fill cap over the opening in the valve cover. The oil fill tube simply unscrews; the fill cap has the same threads and thus screws into its place.
• It is optional, but recommended that the alternator be removed to provide greater access to the passenger side valve cover. It takes 5 minutes to remove and greatly improves maneuverability around the passenger side of the engine.
• Carefully remove the (3) connectors from the FICM, then unbolt and remove it (4 bolts, the 2 rear bolts require a 10 mm socket, the 2 front studs require a 13 mm socket).
• Remove the FICM bracket from the driver side valve cover (5 x 10 mm socket). The bracket shares hardware with the valve cover bolts thus the studs may be removed entirely or the 10 mm nut removed from the stud, leaving the valve cover bolt.

• Disconnect each injector harness connector by pressing the metal clip and pulling away from the connector protruding through the cylinder head. Alternatively, the metal clip can be removed from the connector, however you must be cautious not to lose it.

• Remove the 11 bolts/studs securing the valve cover to the cylinder head. All use a 12 mm socket, although you may have better luck reaching the rear bolt with a 12 mm wrench. There is a 10 mm nut securing the dipstick tube to the front-most valve cover stud that will also need to be removed.
• Once all bolts/studs have been removed, lift the valve cover off the cylinder head and set aside. If the gasket does not come with the valve cover, remove it separately and set aside (it will need to be cleaned and oiled before reinstallation).
2003 to early 2004 Model Year High Pressure Oil Rail Removal
2003 and early 2004 model year engines feature the "log" style high pressure oil rail.
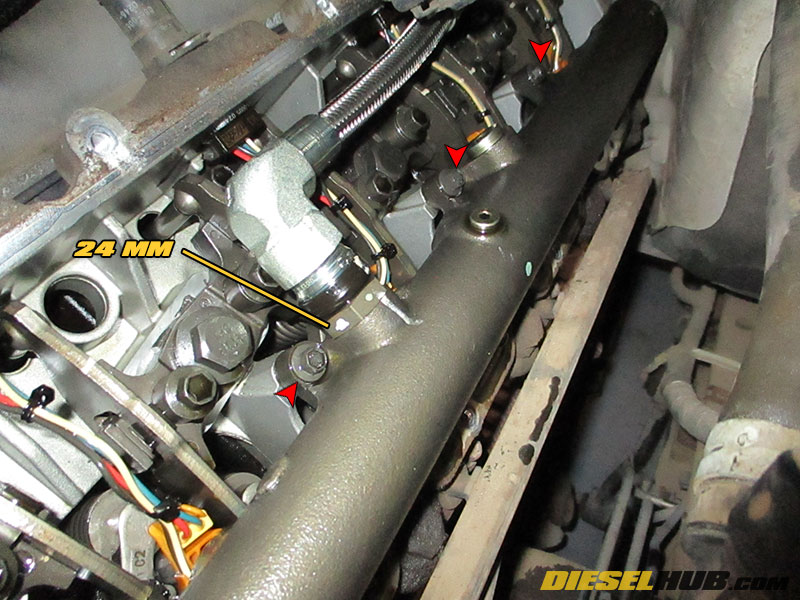
• Loosen then remove the nut (check valve) connecting the stainless steel braided oil line to the oil rail using a 24 mm wrench, then gently push the line aside (alternatively, the STC fitting can be released using OTC 6594, see info below).
• Remove all (8) bolts securing the high pressure oil rail to the cylinder head (8 mm socket). Be extremely careful not to drop any hardware into the cylinder head.
• Gently lift the oil rail upwards away from the cylinder head to free it from the injectors, then allow the oil to drain into the cylinder head. Set the oil rail aside in a clean location once the oil has drained.
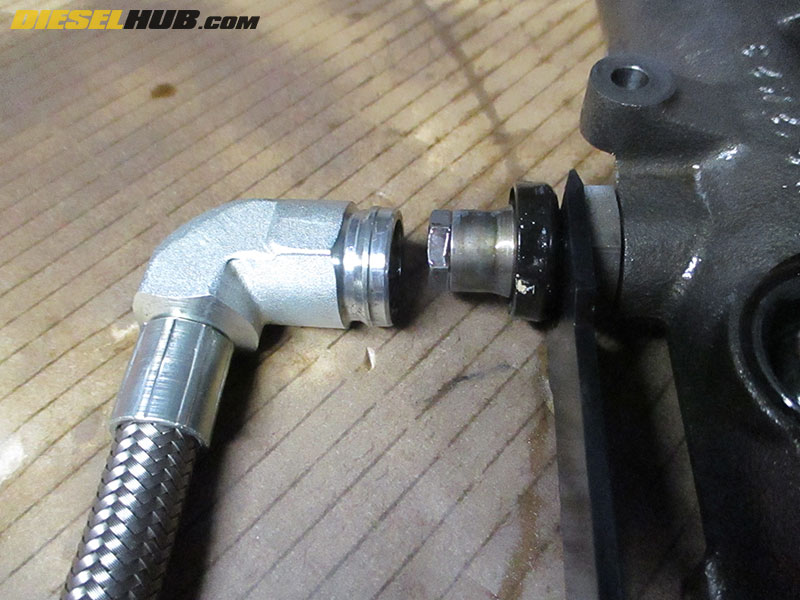
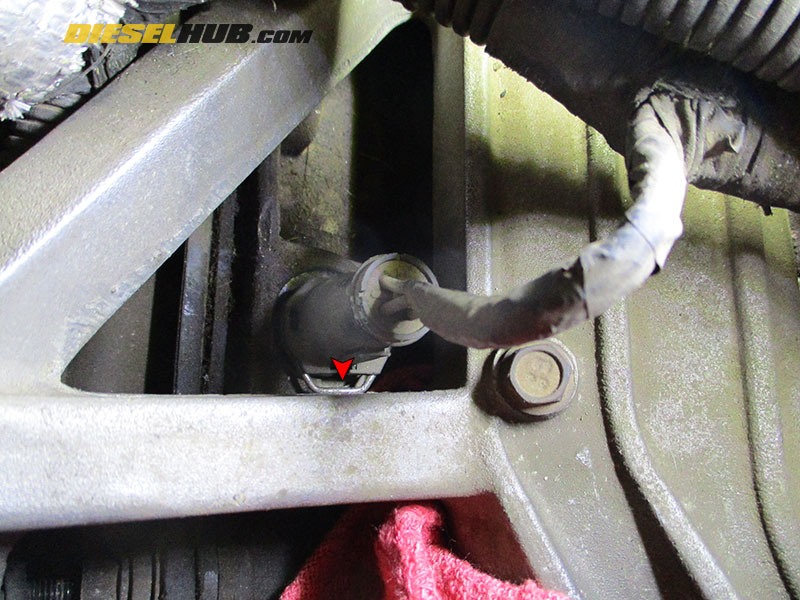
• It's much easier to show how the STC oil line disconnect tool works with the oil rail removed. The fork on the tool (there are two sizes) is inserted as shown. When light pressure is applied up/down, the fitting releases and can be separated. This tool is used on both sides of the stainless steel braided oil line. Do not use excessive force as it may damage the fitting. When the apparatus is released properly, the fitting will separate with a light tug. It may help to push the fitting inwards lightly, then move the tool up and down slightly until it releases. It's a very simple process once you've done it a few times.
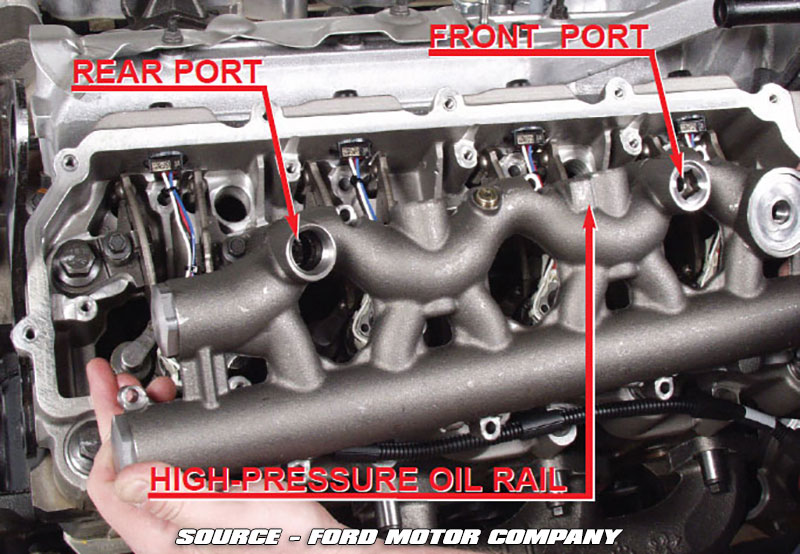
Late 2004 to 2007 Model Year High Pressure Oil Rail Removal
2004.5 and later engines feature the "wavy" style high pressure oil rail.
• Remove the ICP sensor gasket (sandwiched between the oil rail and valve cover - it may have come off with the valve cover; passenger side only).
• Loosen the standpipe using a 12 mm Allen socket.
• Remove the (9) bolts securing the high pressure oil rail to the cylinder head with a T-30 Torx bit. A short Torx bit will be required to reach all hardware for the passenger side oil rail as there is minimal clearance between the rail and heater core.
• Pull the high pressure oil rail away from the cylinder and simultaneously maneuver the standpipe out of the oil rail. On the passenger side, tilting the oil rail towards the driver side while lifting upwards will allow the standpipe to be fished out of the oil rail/engine. With the standpipe out of the way let the oil rail drain into the top of the cylinder head, then set aside in a clean location.
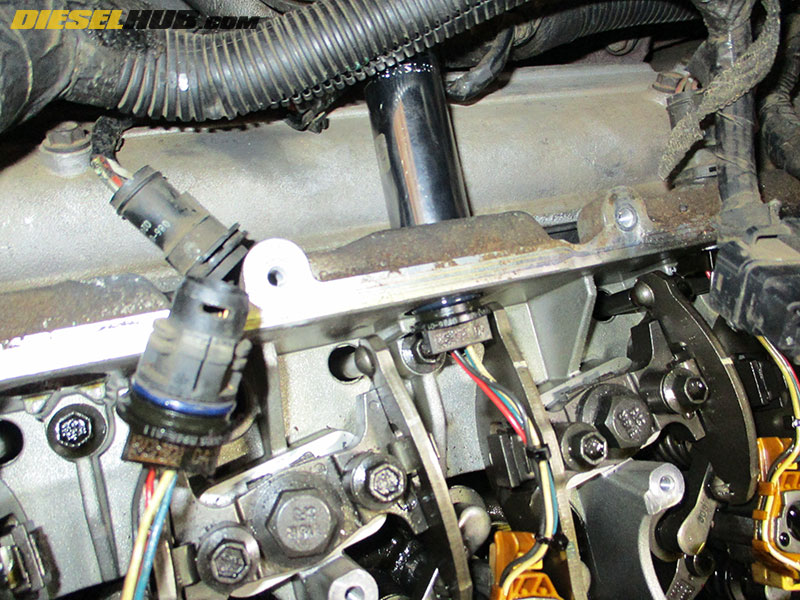
• Disengage each injector electrical connector and push it through the cylinder head. OTC 6766 is designed to release these connectors, but a 19 mm 12 pt socket will also work (it must be a 12 point socket). Simply press the open end of the socket over the connector clips to disengage, then pull the connector through the cylinder head. These can be stubborn and some force is required to release the connectors. Do NOT force the connector or attempt to pry it loose - plastic pieces may fall into the cylinder head if the connector breaks. The original Ford workshop manual calls for a 19 mm 12 pt socket to accomplish this task, but the OTC tool also works well.
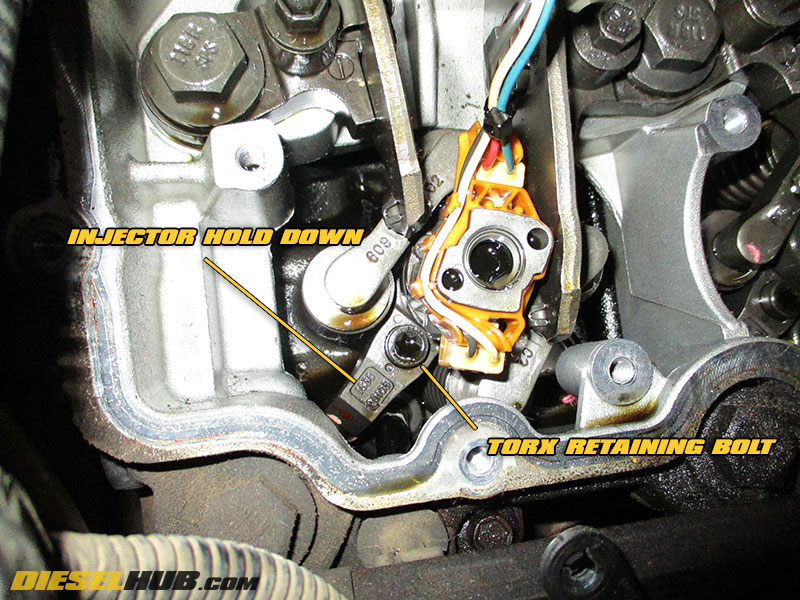
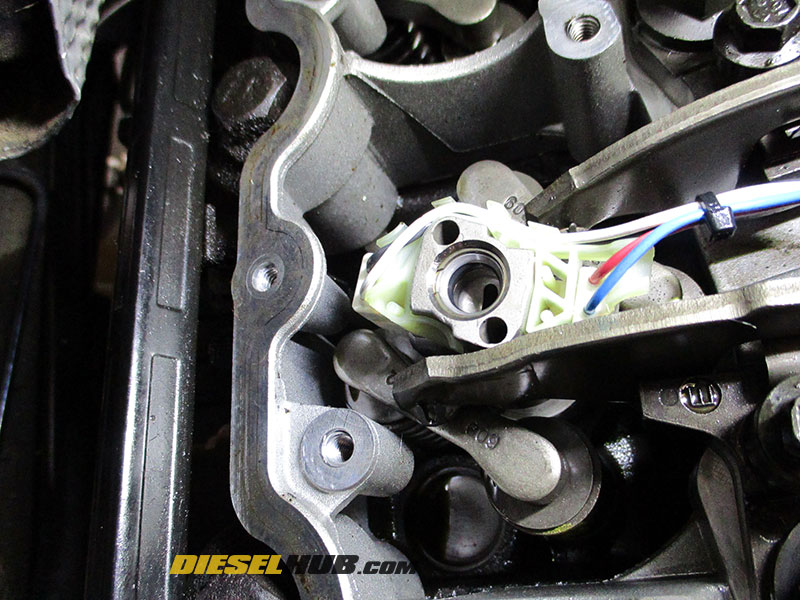
• Remove the injector retaining bolt (see picture for details) using a T-40 Torx driver and any required extensions. It works best to acquire an extra long (2.5" - 3") Torx bit, but a small bit can be taped inside the appropriately sized socket and an extension used to accomplish the task.
• While holding the injector, injector hold down bracket, and T-40 Torx bolt, slide the injector up and out of the injector cup. Securing these three items at once reduces the chances of dropping the bracket/bolt into the cylinder head.
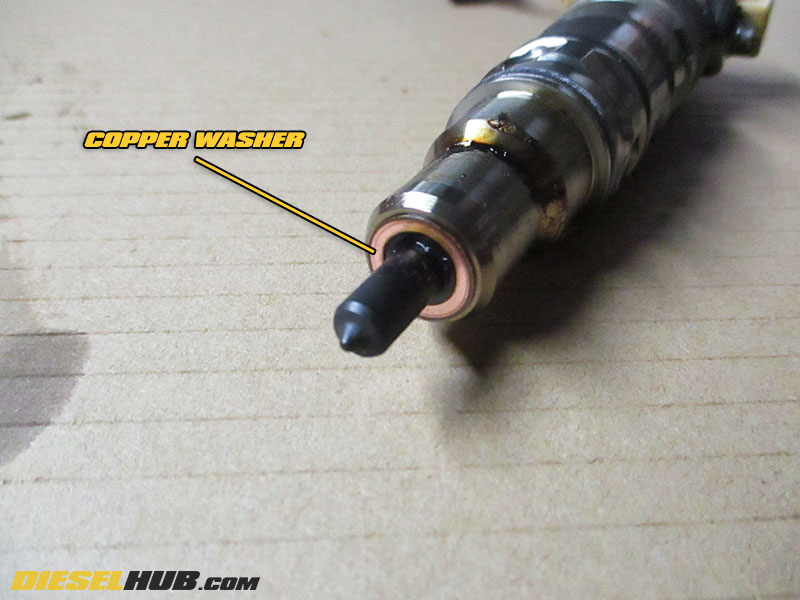
• Verify that the copper washer on the tip of the injector has been removed with the injector. If it has not, use a small pick to retrieve it from the injector cup.
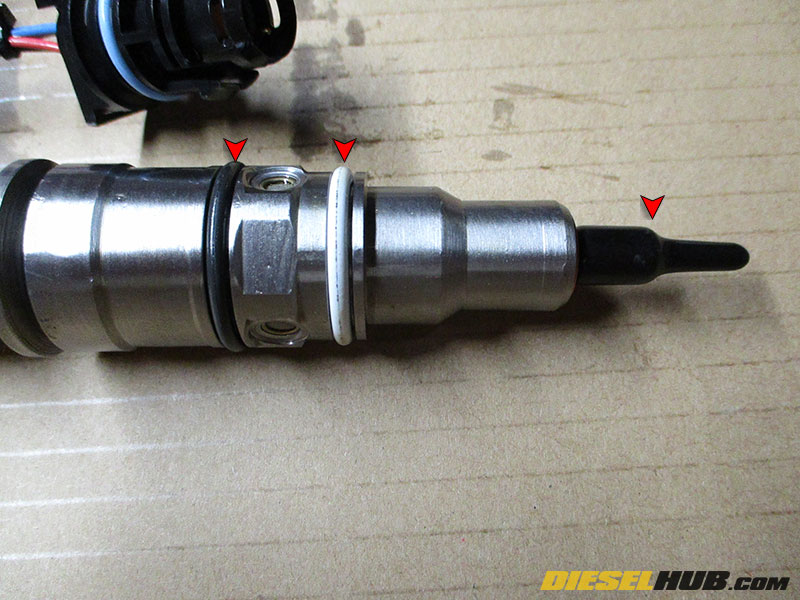
• Remove the rubber safety cup from the injector nozzle and lubricate the injector o-rings with clean motor oil.
• Assemble the injector hold down bracket (it can only be installed one way) to the fuel injector. Slide the fuel injector into the injector cup in the cylinder head and start the Torx retaining bolt by hand.
• Torque the injector hold down bolt to 24 ft-lbs, then snug it up slightly more for good measure (it is imperative that the copper crush washer seals properly).
• Push the injector connector through the hole in the cylinder head. It will snap into place when it is fully seated. If you do not feel and/or hear it seat, push the connector back through the hole and repeat until it is installed properly. The connector may need to be rotated slightly to align and engage properly during installation. Always verify the connector is seated by attempted to push it back through the hole.
• Repeat for all injectors that are being replaced.
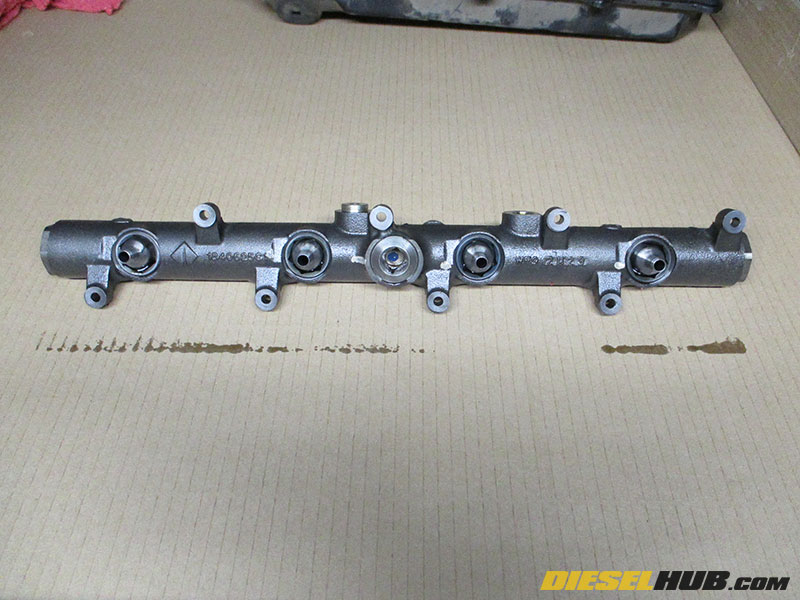
• We highly recommend rebuilding the high pressure oil rail with new nipple cups and nipple cup seals. See 6.0L Power Stroke Nipple Cup and Nipple Cup Seal Replacement Procedures for additional information.
• Lubricate the o-ring at the top of the injector solenoid using clean motor oil.
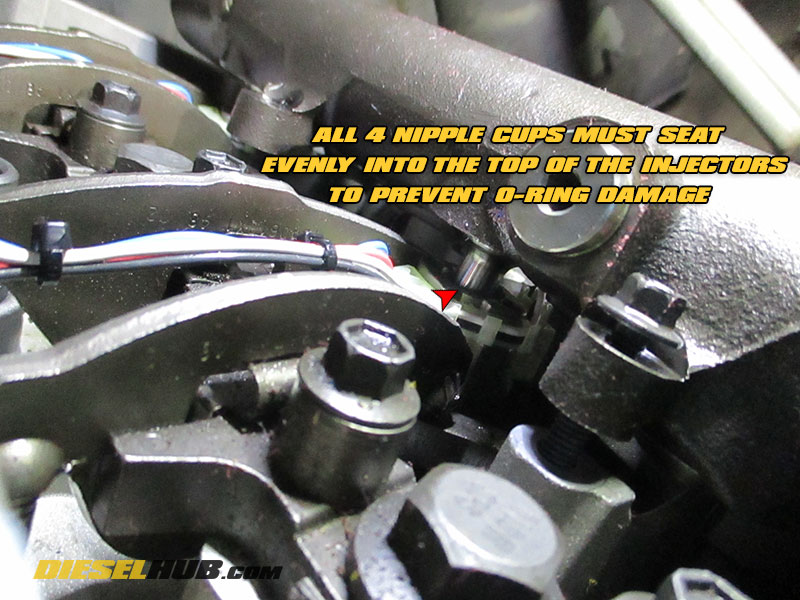
• Reinstall the high pressure oil rail (and standpipe for 2004.5+ model years) in the reverse order it was removed. Ensure that the nipple cups properly seat into the top of the injector. Torque all bolts to 96 in-lbs (INCH LBS). Torque the standpipe to 33 ft-lbs.
• Reinstall the braided oil rail line (2003 and early 2004 model years only).

• Reinstall the valve cover and all associated components.
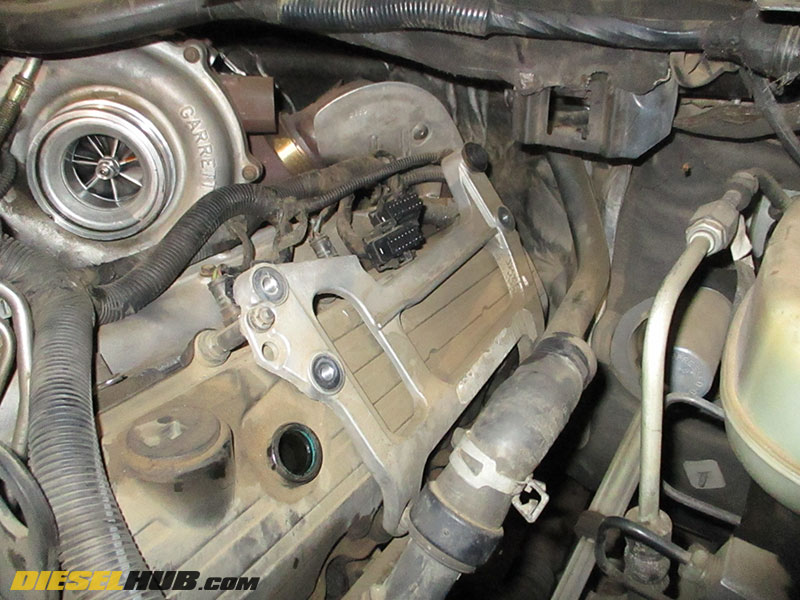
• There is considerable less room to work on the passenger side of the engine. Begin by remove the transmission dipstick tube and positioning it aside (zip tying to a nearby hose works well).
• Release the injector harness connectors. The number one cylinder connector is particularly confined on 2003 and early 2004 model year engines, however the clip can be pressed inwards using a long flathead screwdriver. Remember, you do NOT have to remove the metal clip to release the connector - you can simply press it into the body of the connector. International changed the orientation of the metal clips in 2004.5 in order to make them easier to access.

• Remove the valve cover. It's not nearly as difficult as it may seem and you can access all the bolts/studs using a 12 mm wrench (or even ratcheting wrench) on the difficult to access bolts and a 12 mm socket (w/ extensions as necessary) for the remaining hardware.
• Once all bolts/studs are removed, pull the valve cover forward towards the front of the engine and to the left of the AC hose, then flip it vertically out of the truck to clear the wiring harness.
• Replace the injectors per the aforementioned instructions, then reinstall the valve cover and all associated components. You will need to realign the transmission dipstick tube into the transmission when reinstalling.

• Reinstall any previously removed components (air cleaner, glow plug controller, FICM, etc) if you have not already done so.
• Refill the radiator with engine coolant through the degas tank.
• Verify the battery condition/charge. If the batteries are weak or depleted, charge them before continuing. WARNING - a low voltage condition resulting from weak batteries is the number one cause of FICM failures; do NOT continue unless the batteries are fully charged.
• Cycle the key to the "RUN" position until the fuel pump stops running (roughly 10 seconds). Repeat for a total of 3 to 5 times so that the injector fuel supply fills with diesel.
• Crank the engine over for 10 seconds, then allow the starter to cool for 1 to 2 minutes. Repeat this cycle until the engine starts. Note that it may take 5 to 10 cranking cycles before the engine will run; this is completely normal as the engine must refill the emptied high pressure oil rails with engine oil before the injectors can fire.
• The engine will run rough for some time. Check for oil leaks while you allow the engine to idle for 3 to 5 minutes, then take the truck for a short drive. Check for oil leaks once again, then drive truck conservatively until all air is purged from the high pressure oil system.
We highly advise using Archoil AR9100 oil additive (at least every other oil change) and a quality fuel additive, such as Opti-Lube XDP, to prolong injector life and prevent the occurrence of stiction in the injector solenoid.